

Hello!
This is a special project-very special. Four years ago I was celebrating my 40th birthday with one of my closest friends and he presented me with Tamiya’s 1/32 P-51D Mustang! I was blown away with his generosity and kindness as he had also arranged with the help of my family the trip of a lifetime in the USA. I was not expecting this wonderful gift and I was so grateful to him for all he done already. I was literally floored!
Thanks to my friend Frank I have built many wonderful kits including my beloved Spitfire MH434 which was also a 1/32 Tamiya kit. I knew that this Mustang would have to be built in his honour and so I could not think of a more fitting scheme than Ferocious Frankie.
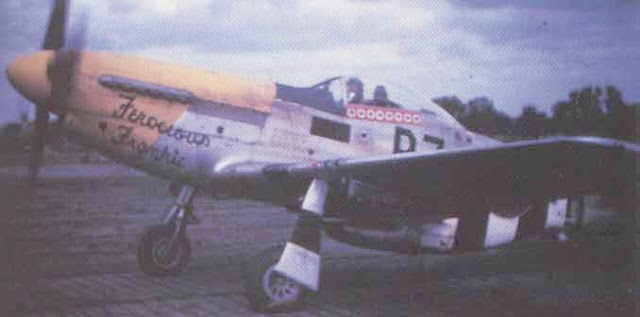
This P-51D was flown by Major Wallace E. Hopkins, and Ferocious Frankie was named in honour of his wife Frankie. Coded B7 H of the 374th Fighter Squadron, 361st Fighter Group. Wallace Hopkins was born in Washington, Georgia and flew a total of 76 combat missions with the 361st where he flew as Operations Officer. He was an ACE credited with 8 victories and 1.5 damaged. His decorations include the Air Medal and Distinguished Flying Cross both with Oak Leaf Clusters and the French Croix de Guerre, one of four awarded to members of the 361st. During WWII the 374th Fighter Squadron was based in southern England and distinguished itself in the finest traditions of the USAAF.
Here is how Ferocious Frankie looked with her full yellow nose towards the later end of the war, the D-day invasion stripes clearly visible.

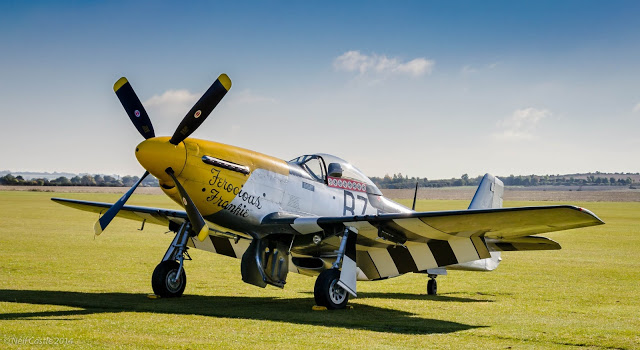
It so happens that today that The Old Flying Machine Company owns and operates a
P-51D Mustang finished in the colours of Ferocious Frankie based a IWM Duxford alongside, my favourite Spitfire MH434. It seems quite fitting then that as in real life, I shall have MH434 and Ferocious Frankie displayed together.
Below, the modern day Ferocious Frankie at IWM Duxford. A place I truly love.

So why has it taken me so long to get around to building this model? Well, firstly I was a little nervous! This is a high end, expensive kit that my friend has given to me-I don’t want to mess this up! Secondly, life gets in the way, things happen. As I wrote back in 2015, I became very ill due to my disability and after a very complex operation I am lucky to still have the use of my hands! I wanted to wait until I felt confident enough to built it and make a decent job of it. So now the time has come and this kit is on my bench.
The kit:
Tamiya 1/32 P-51D MUSTANG:
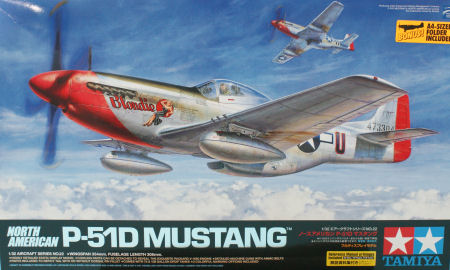
This is an incredible kit and it’s engineering and tooling is more than impressive! Upon opening the box and examining the highly detailed parts and the quality of the instructions, decals and so on I knew that this was something special. It is a complex kit to be sure but its quality is unsurpassed.
To show you how good it is, here is a review by Brett Green of Hyperscale:
Tamiya 1/32 P-51D Mustang Review
Now we have seen whats ahead of us, let us begin!
And so it begins! With this kit construction starts with the Mustang’s engine.

The kit engine sprayed black and dry brushed with aluminium. At this point we could add a lot of detail to this engine but with build I am going to cover it up so the engine and it’s framing will not need further painting.
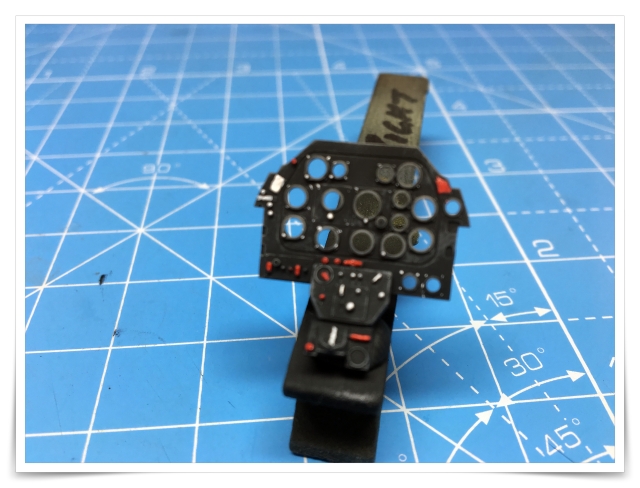
The instrument panel is assembled and painted in Nato Black. It was then dry brushed with light grey and all the details were picked out with oil paints.

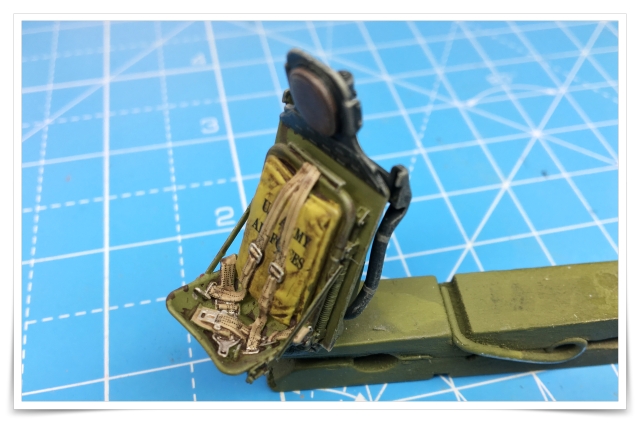
This seat is an aftermarket item from Barracuda. I chose it as I liked the moulded in seat harness and much more realistic seat cushion. This seat was painted in acrylics, dry brushed grey and given a thin enamel wash to bring out the details. I think this gives the seat a lived in look.
Here the instrument panel has had its instruments fitted. Tamiya gives us a decal to add to the clear lenses that are fitted to the rear of the panel.

Next the cockpit. All the parts were base painted in my own mix of US Interior Green, then I added the wood panel floor by painting it a medium brown shade and ten by painting thin dark brown streaks to represent grain. I added texture to the surface by scraping a needle in the same direction as the streaks as the paint was drying. I thought the effect worked quite well!

A little wiring was added to this area and details were picked out with light shades.

The cockpit sidewalls have been painted and detailed.

The kit gunsight, great to look at-fiddly as the devil to put together!

This is as far as I have got with our Mustang so far, be sure to look out for my next WIP update.

Take care and Happy Modelling!
Darren.

I love your zinc chromate.
LikeLiked by 1 person
Thanks. It is my own colour mix. I did that as some stock ZC pints are too yellow for my taste.
LikeLike
Looking great! I have two Tamiya kits in the stash (one, third, almost done!) – but i plan to do Ferocious Frankie witha Revell kit.. :9
LikeLiked by 1 person
Thanks Tobias, those Tamiya Mustangs are fantastic kits.
LikeLike